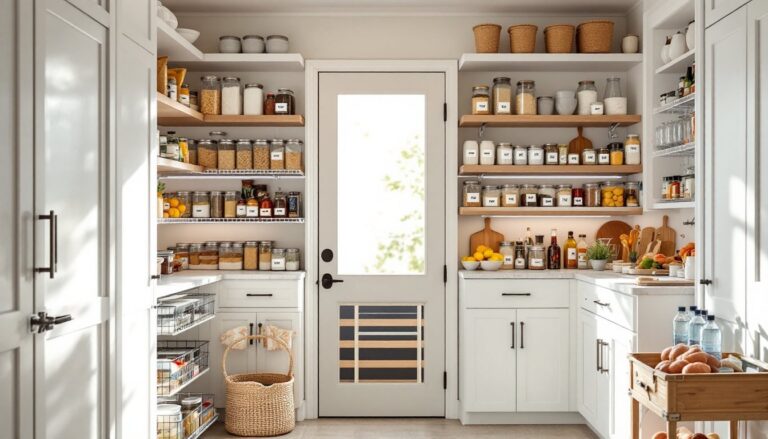
A disorganized pantry turns meal prep into a scavenger hunt. Half-open cereal bags, mystery spices from 2019, canned goods playing Jenga, it’s frustrating, wasteful, and makes every grocery trip an exercise in guessing what’s already on hand. But a well-planned pantry? That’s a different story. It saves time, reduces food waste, and makes cooking feel less chaotic. Whether you’re working with a walk-in closet, a narrow reach-in space, or a few repurposed cabinets, the right organizational strategies can turn any pantry into a functional powerhouse. This guide walks through assessing your space, choosing the right storage solutions, matching designs to your kitchen, and tackling DIY upgrades without hiring a contractor.
Table of Contents
ToggleKey Takeaways
- Assess your pantry space by measuring dimensions, noting obstacles, inventorying items by category, and identifying pain points before implementing any organizational systems.
- Clear, airtight containers with consistent labels are essential for keeping dry goods fresh and making inventory visible, with standard sizes ranging from 0.5 quarts for spices to 4–6 quarts for bulk items.
- Adjustable shelving, pull-out drawers with heavy-duty slides, and strategic use of vertical space maximize accessibility and can double pantry capacity without requiring structural changes.
- Match pantry organization designs to your kitchen aesthetic by choosing complementary styles—whether modern/minimalist, farmhouse, industrial, or traditional—while maintaining visual consistency across containers and materials.
- DIY pantry organization ideas like installing adjustable shelving, adding pull-out wire baskets, and upgrading lighting can be completed with basic tools in under an hour per project without permits or professional help.
- Ensure accessibility for all household members by keeping frequently used items between 15–48 inches from the floor and using pull-out shelves or motion-activated lighting to accommodate different mobility needs.
Assess Your Pantry Space and Needs
Before buying a single bin or shelf bracket, measure the space. Record width, depth, and height of each wall or shelf section. Note fixed obstacles: light fixtures, switches, heating vents, or plumbing. These details determine what fits and what doesn’t.
Next, inventory what’s actually stored. Group items by category: baking supplies, canned goods, snacks, breakfast items, oils and condiments, bulk dry goods. Count how many of each you typically keep on hand. A household that buys rice in 25-pound bags has different needs than one with two small canisters.
Consider traffic patterns and who uses the pantry. If kids grab snacks daily, lower shelves should hold child-safe items in easy-to-open containers. If multiple cooks share the space, logical zoning reduces collisions. Tall shelves work for rarely-used appliances or party supplies: prime eye-level real estate should go to frequently accessed staples.
Identify pain points. Do items get lost in deep shelves? Are upper shelves wasted because no one can reach them? Does the door swing block access? Write down these friction points, they’ll guide which solutions to prioritize.
Essential Storage Solutions for Every Pantry Type
Clear Containers and Labeling Systems
Clear, airtight containers are the backbone of any organized pantry. They keep dry goods fresh, prevent pest infiltration, and make inventory visible at a glance. Standard sizes to stock:
- Small (0.5–1 quart): Spices, baking powder, yeast, seeds
- Medium (2–3 quarts): Pasta, rice, flour, sugar, snacks
- Large (4–6 quarts): Cereal, bulk nuts, pet food, baking mixes
Look for containers with stackable lids and square or rectangular footprints, they use shelf space more efficiently than round jars. Materials matter: BPA-free plastic is lightweight and shatter-resistant: borosilicate glass is heavier but doesn’t absorb odors or stain.
Labeling isn’t optional. Even if you think you’ll remember, you won’t. Use a label maker for a clean look, or chalkboard labels for flexibility. Include the item name and purchase or expiration date. For bulk staples like flour, note the type (all-purpose, bread, whole wheat). Consistent labeling across containers makes restocking faster and reduces the chance of grabbing baking soda when you meant baking powder.
Many organizing strategies for small spaces rely on uniform containers to create visual calm and maximize every inch.
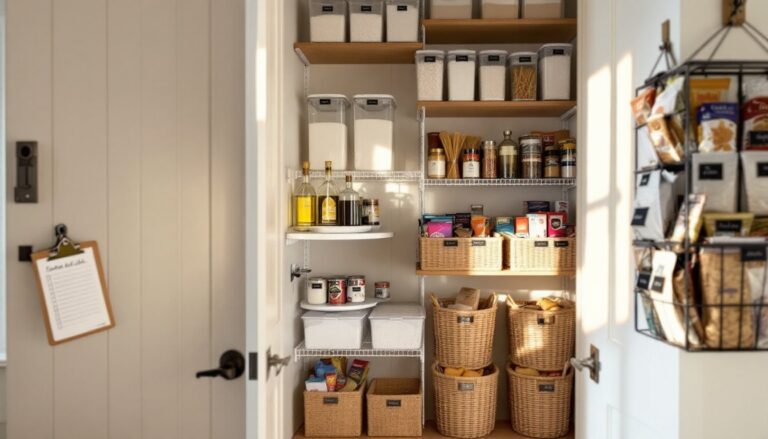
Shelving and Drawer Configurations
Adjustable wire or wood shelving is standard in most pantries, but the default spacing rarely works well. Re-position shelves to match the height of what you store. Leave 12–14 inches between shelves for cereal boxes and canned goods: 6–8 inches works for spice jars or small packets. Don’t waste vertical space.
Pull-out drawers or baskets solve the deep-shelf problem. Install heavy-duty drawer slides rated for at least 75 pounds per pair if you’re storing cans or appliances. Soft-close slides cost a bit more but prevent slamming and wear. For reach-in pantries, pull-out wire baskets on full-extension slides (which extend the entire depth of the cabinet) make the back wall accessible.
Lazy Susans or tiered turntables work well in corner cabinets or on deep shelves for oils, vinegars, and condiments. Choose models with raised edges to prevent bottles from sliding off.
Consider door-mounted racks for shallow items: spice packets, foil and plastic wrap, cleaning supplies. Standard over-the-door racks require clearance: if space is tight, look for slim racks that mount with screws inside the door frame. Be mindful of weight, pantry doors aren’t load-bearing, and overloading can sag hinges or crack frames.
Design Styles to Match Your Kitchen Aesthetic
Pantry design should complement the kitchen, not clash with it. Here are common styles and how to execute them.
Modern/Minimalist: Clean lines, uniform containers, neutral tones. Use white or clear bins, black or metallic labels, and matte-finish shelving. Avoid busy patterns or mixed materials. LED strip lighting under shelves adds a sleek touch and improves visibility without adding clutter.
Farmhouse/Rustic: Natural wood shelves, woven baskets, glass jars with metal lids, and hand-lettered labels. Reclaimed pine or cedar shelving (actual dimensions: 1×10 nominal is ¾”×9¼”, 1×12 is ¾”×11¼”) brings warmth. Galvanized metal bins work for potatoes and onions. Keep it functional, rustic doesn’t mean disorganized.
Industrial: Open metal shelving (think restaurant-grade wire racks or black pipe-and-wood combos), stainless steel or mesh bins, Edison bulb fixtures. This style tolerates visible hardware and utilitarian aesthetics. It’s practical for high-traffic or commercial-style home kitchens.
Traditional/Classic: Painted wood cabinetry, crown molding, and decorative hardware. If retrofitting an existing pantry, add trim or beadboard to the back wall. Use matching bins in muted colors (cream, sage, navy). Glass canisters with ceramic or wood lids maintain the refined look.
Whichever style you choose, consistency is key. Mixing too many container types, label fonts, or materials creates visual noise. For those seeking comprehensive pantry organization systems, a unified design amplifies both function and aesthetics.
Maximizing Vertical Space and Accessibility
Most pantries waste the top 12–18 inches and the bottom 6 inches. Reclaim that real estate.
Upper zones: Install an additional shelf or use stackable shelf risers to double capacity. Store items used infrequently, holiday baking supplies, extra Mason jars, bulk paper goods. A folding step stool (rated for at least 250 pounds) makes high shelves accessible without risking a wobbly chair. Mount it on a hook inside the pantry door when not in use.
Lower zones: Use pull-out bins or rolling carts for heavy items like bottled water, soda, or pet food bags. Wheels make retrieval easier and prevent back strain. If the pantry has a floor-to-ceiling layout, consider a library ladder on a rail system for ultra-tall spaces, check that walls can support the bracket load (typically requires solid blocking or studs).
Vertical dividers for baking sheets, cutting boards, and trays prevent the dreaded avalanche when you pull one item. Install them between shelves using adjustable tension rods or screw-mounted dividers spaced 1.5–2 inches apart.
Accessibility also means accommodating different users. If someone in the household uses a wheelchair or has limited reach, keep essentials between 15 and 48 inches from the floor (ADA guidelines). Pull-out shelves, lever-style handles, and motion-activated lighting make the space more inclusive.
Ideas for drawer organization in kitchens often translate well to pantry zones, especially for utensils, small gadgets, and boxed items that tumble easily.
DIY Pantry Organization Projects You Can Start Today
These projects require basic tools and materials available at any home center. None involve structural changes or permits.
Install Adjustable Shelving
- Measure the interior width and depth. For shelves spanning more than 36 inches, plan a center support to prevent sagging.
- Cut ¾-inch plywood or pine boards to size. Sand edges to prevent splinters.
- Install adjustable shelf standards (metal tracks with slots) on each side wall, screwing into studs or using heavy-duty anchors for drywall. Space tracks 16–24 inches apart for stability.
- Insert shelf brackets (clips) at desired heights. Rest shelves on brackets. No glue or screws needed, shelves lift out for reconfiguration.
Build a Spice Rack Drawer Insert
- Measure the drawer interior. Cut ¼-inch plywood strips to create tiered steps (each step 2–3 inches tall).
- Assemble with wood glue and 1-inch brads. A brad nailer speeds this up, but a hammer and finish nails work fine.
- Sand, then finish with water-based polyurethane if desired. Let dry fully before loading spices.
- Lay flat in the drawer. Bottles sit angled so labels face up, no more digging.
Add Pull-Out Wire Baskets
- Buy sliding basket kits sized to your cabinet depth (common sizes: 11″, 14″, 17″, 21″ deep).
- Mount side rails to cabinet walls using the included screws. Check that rails are level, use a 4-foot spirit level or laser level.
- Snap baskets onto rails. Test the glide: adjust if binding occurs.
- These kits don’t require cutting and install in under 30 minutes per basket.
Create a Charging Station for Small Appliances
If countertop space is tight, dedicate a pantry shelf to a toaster, coffee grinder, or hand mixer.
- Install an in-wall power outlet on the pantry wall (requires basic electrical skills and possibly a permit, if unsure, hire a licensed electrician). Alternatively, run a surge-protected power strip secured to the back of a shelf.
- Use cord management clips or Velcro straps to prevent tangles.
- Store appliances on a pull-out tray so they slide forward when needed.
Safety note: Pantries aren’t typically designed for high-draw appliances. Don’t overload circuits. If adding outlets, follow NEC Article 210 for branch circuit requirements and consult local building codes.
For inspiration on transforming underutilized spaces, garage organization projects that employ similar shelving and bin strategies.
Make Custom Labels
Skip the label maker if you prefer a handmade look.
- Print templates on adhesive-backed kraft paper or plain cardstock.
- Hand-letter with a fine-tip permanent marker or paint pen.
- Laminate (use clear packing tape if you don’t own a laminator) to protect from moisture and oil.
- Affix to containers with double-sided tape or adhesive dots.
Refresh Paint and Lighting
A fresh coat of paint and better lighting transform a dark pantry instantly.
- Paint: Use semi-gloss or satin finish in white or a light neutral. These sheens are wipeable and reflect light. One gallon covers roughly 350–400 square feet: a standard reach-in pantry needs less than a quart.
- Lighting: Swap a single overhead bulb for LED strip lights or puck lights mounted under each shelf. Battery-operated models install with adhesive backing (no wiring). Hardwired options provide brighter, continuous power but require running cable, hire an electrician if you’re not comfortable with electrical work.
Additional DIY inspiration for home organization projects can be found in resources like The Kitchn, which regularly features small-space solutions and layout ideas.
Wear appropriate PPE: safety glasses when cutting or drilling, dust mask when sanding, and gloves when handling rough lumber or sharp metal edges. Keep the workspace ventilated if using paint, stain, or adhesive.