A chaotic pantry isn’t just an eyesore, it’s a daily drain on time, money, and sanity. Expired cans buried behind cereal boxes, mysterious spills on shelves, and that packet of taco seasoning that’s been missing for three months all add up to wasted groceries and meal-planning headaches. Whether you’re working with a walk-in pantry or a single cupboard, a solid organization system turns grocery chaos into a functional workspace. This guide walks through proven strategies to maximize storage, reduce food waste, and create a pantry that actually serves your household instead of frustrating it.
Table of Contents
ToggleKey Takeaways
- Food pantry organization ideas reduce household food waste by up to 30-40% and prevent pest infestations through sealed containers and regular cleaning.
- Start your food pantry organization with a complete cleanout: check expiration dates, wipe surfaces, assess shelving, and group similar items before buying storage solutions.
- Use smart storage tools like lazy Susans, shelf risers, door racks, and airtight containers to maximize vertical space and keep dry goods fresh longer.
- Implement zone-based organization by grouping items by use—breakfast items at eye level, baking supplies at waist height, and bulk items on highest or lowest shelves—for faster daily access.
- Label all containers with contents and dates, use the first-in-first-out rotation method, and conduct quick 10-minute weekly resets plus full cleanouts every 3-6 months to maintain your system.
- Clear containers and simple inventory systems (paper or app-based) help prevent overbuyingand decision fatigue while making meal planning quicker and more efficient.
Why Pantry Organization Matters for Your Home
Pantry organization isn’t Pinterest fluff, it’s basic home maintenance that saves real money and prevents real problems. The USDA estimates that American households waste roughly 30-40% of their food supply, and a disorganized pantry is a major contributor. When you can’t see what you have, you overbuy, items expire before use, and meal planning becomes guesswork.
An organized pantry also protects your home from pests. Opened packages, spills, and forgotten crumbs attract pantry moths, ants, and rodents. Transferring dry goods to sealed containers and keeping shelves clean eliminates food sources and breeding grounds.
Beyond the practical benefits, a functional pantry reduces decision fatigue. When everything has a designated spot and you can see your inventory at a glance, weeknight dinner planning takes minutes instead of half an hour of staring into a cluttered abyss. For homes with multiple cooks or kids who pack their own lunches, clear organization systems mean everyone can find what they need without tearing apart shelves.
Start With a Complete Pantry Cleanout
You can’t organize clutter, you can only relocate it. Before buying a single storage container, empty the entire pantry. Yes, all of it. Pull every item off every shelf.
Step 1: Check expiration dates ruthlessly. Toss expired items, opened packages from 2024 that smell off, and anything you genuinely won’t eat. Donate unopened, non-expired items you know you won’t use to a local food bank.
Step 2: Wipe down every surface. Use warm soapy water or a vinegar solution to remove sticky residue, crumbs, and dust. Check corners and shelf edges for signs of pest activity, webbing, droppings, or small holes in packaging mean you may need to address an infestation before restocking.
Step 3: Assess your shelving. Adjustable wire shelving is standard in most pantries, but if your shelves are fixed and spaced poorly (common in older homes), this is the time to consider adding shelf risers or installing new adjustable standards and brackets. Fixed shelves spaced 16-18 inches apart waste vertical space for shorter items like canned goods.
Step 4: Group similar items as you sort. Create piles for baking supplies, canned goods, snacks, breakfast items, pasta and grains, oils and condiments, and paper goods. This sorting exercise reveals how much space each category actually needs and whether your current pantry footprint can handle your household’s buying habits.
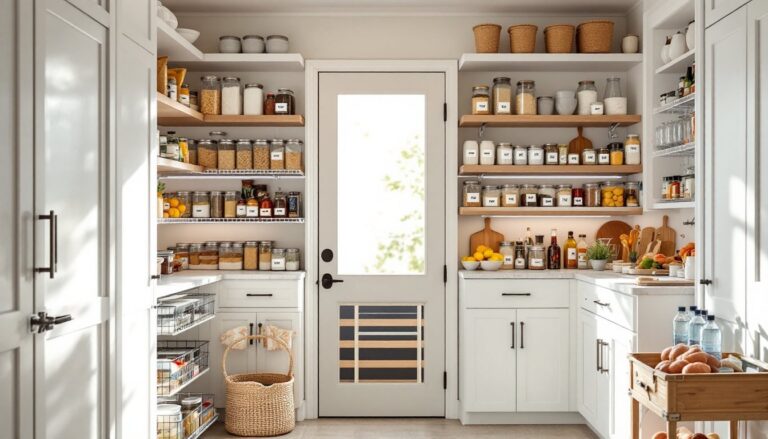
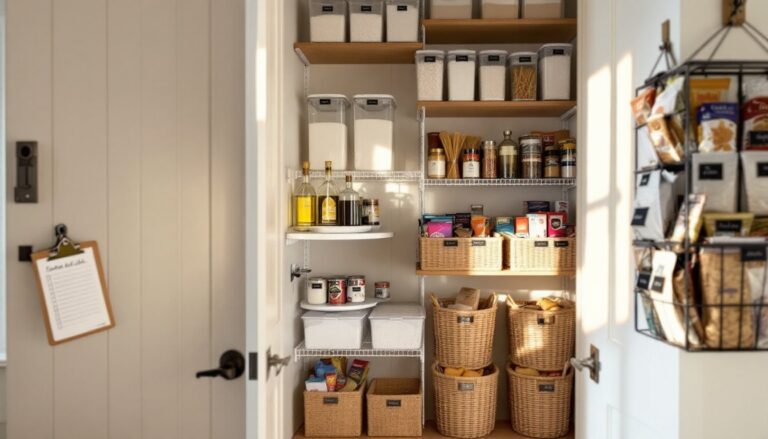
Smart Storage Solutions for Maximum Space
The right containers and hardware multiply usable space and keep food fresh. But not all storage solutions work for every pantry, match your picks to your space and shopping habits.
Lazy Susans are pantry workhorses for corner shelves and deep cabinets. Use them for oils, vinegars, sauces, and small jars that otherwise get lost in the back. A 12-inch turntable fits most standard shelves: go with two-tier models for taller items like bottles.
Shelf risers double your vertical space. Simple wire or acrylic risers (typically 4-6 inches tall) let you stack canned goods or boxed items without creating teetering pyramids. They’re especially useful if you have fixed shelves spaced too far apart.
Door racks capture dead space on the back of pantry doors. Over-the-door organizers with shallow wire baskets work for spice packets, snack bars, and seasoning mixes. Make sure the rack doesn’t interfere with items on shelves when the door closes, measure clearance before installing.
Pull-out drawers or sliding baskets transform deep lower shelves from black holes into accessible storage. If you’re handy, retrofit existing shelves with under-mount drawer slides (common in kitchen cabinet upgrades). For renters or quick fixes, standalone rolling carts work, though they sacrifice some depth.
Containers and Bins That Actually Work
Sealed airtight containers aren’t optional for dry goods, they’re mandatory. Flour, sugar, rice, pasta, cereal, and anything else that comes in cardboard or flimsy plastic bags should go into hard-sided containers with locking lids. This prevents pest infestations and keeps food fresh longer.
For container sizing, consider your buying habits. If you buy 25-pound bags of rice or flour from warehouse stores, invest in 10-12 quart containers with pour spouts. For standard grocery store quantities, 4-6 quart containers handle most needs. Square or rectangular containers use space more efficiently than round ones, they nest against each other without gaps.
Clear containers (acrylic, PET, or glass) let you see contents and inventory at a glance. While glass looks great and doesn’t stain, it’s heavy and breakable. BPA-free plastic is lighter and safer for higher shelves. Look for containers labeled food-grade and dishwasher-safe.
For bulky items like chip bags, crackers, and bread, open bins or baskets keep like items together without requiring transfers. Use clear acrylic bins for visibility or wire baskets for ventilation (good for onions and potatoes). Similar strategies work for kitchen drawer organization, where clear dividers prevent utensil chaos.
Skip the matching container sets unless you’ve measured your actual needs. Most sets include sizes you won’t use. Buy containers individually based on what you actually store.
Zone-Based Organization Systems
Grouping items by use (not just by type) makes daily pantry access faster and keeps order from degrading over time. Think like a restaurant line cook: stations for specific tasks.
Baking zone: Flour, sugar, baking powder, baking soda, chocolate chips, extracts, and measuring cups all in one area. Keep this zone at waist height or lower, baking supplies are heavy and used less frequently than daily staples.
Breakfast zone: Cereal, oatmeal, granola bars, coffee, tea, and pancake mix. Place this at eye level for easy morning access, especially if kids are grabbing their own breakfast. Professionals organizing multiple pantry systems often dedicate entire shelves to high-traffic breakfast items.
Cooking zone: Oils, vinegars, canned tomatoes, beans, pasta, rice, stocks, and sauces. Position near your stove if the pantry is adjacent to the cooking area. Store oils away from direct light and heat sources to prevent rancidity.
Snack zone: Chips, crackers, nuts, dried fruit, and grab-and-go items. Lower shelves work well if you have kids who self-serve: higher shelves if you’re portion-controlling treats.
Bulk and backup zone: Extra paper towels, overflow canned goods, backup condiments, and bulk purchases. These go on the highest or lowest shelves since they’re accessed least often.
For walk-in pantries, arrange zones from front to back based on frequency of use. Daily items near the door, occasional items toward the back. For cabinet pantries, use the prime middle shelves for your most-used zones and relegate bulk storage to top and bottom.
Keep a small clearance (2-3 inches) between the back wall and your deepest items for air circulation and to prevent moisture buildup, especially important in humid climates or if the pantry shares a wall with exterior space.
Labeling and Inventory Strategies
Labels aren’t cute, they’re functional. They keep everyone in the household (including you at 7 p.m. on a Wednesday) from putting things back in the wrong spot.
Label containers clearly with both contents and purchase or expiration dates. A label maker works, but painter’s tape and a Sharpie get the job done for a dollar. For decanted dry goods, write the original expiration date from the package on the container, don’t assume you’ll remember.
Label shelf zones if you have multiple people accessing the pantry. Simple printed labels taped to shelf edges (“Baking,” “Pasta & Grains,” “Snacks”) reduce the mental load for everyone and prevent the gradual drift toward chaos.
For homes that bulk-buy or struggle with food waste, a simple inventory sheet taped inside the pantry door helps. List categories down the left side and tally quantities when you restock. Cross items off as you use them. This prevents the classic “I thought we had” moments mid-recipe. Apps exist for this (Pantry Check, NoWaste), but a paper list works fine and doesn’t require pulling out your phone with flour-covered hands.
Rotate stock using the “first in, first out” (FIFO) method common in food service. When you add new items, move older ones to the front. Studies on effective kitchen organization consistently show that visibility and rotation reduce waste more than any other single factor.
For spices, date them when opened, ground spices lose potency after 6-12 months. Line them up on a tiered spice rack or use a drawer insert so you can see labels at a glance. Alphabetizing helps if you have 20+ spices: for smaller collections, grouping by use (baking spices vs. savory) works better.
Consider implementing strategies that extend beyond the pantry. Smart storage thinking in garages, basements, and other utility areas follows the same principles: zone, contain, label, and rotate.
Conclusion
A well-organized pantry won’t stay that way without maintenance. Plan a quick 10-minute reset weekly, consolidate opened packages, wipe up spills, and move older items forward. Do a full inventory and cleanout every 3-6 months to catch expired goods and reassess whether your system still fits your household’s needs. The goal isn’t magazine-perfect shelves, it’s a functional workspace that saves time, money, and aggravation every single day.