A cluttered countertop isn’t just an eyesore, it’s wasted real estate in the heart of your home. Every square inch of counter space matters, especially when you’re prepping meals, juggling appliances, or trying to find your coffee maker under a pile of mail. The good news? Organizing your kitchen counters doesn’t require a full renovation or expensive custom cabinetry. With a few strategic changes and the right storage solutions, anyone can reclaim their workspace and turn chaos into efficiency. This guide walks through proven tactics to clear the clutter, maximize vertical space, and create functional zones that actually work for daily life.
Table of Contents
ToggleKey Takeaways
- Kitchen countertop organization improves meal prep efficiency, reduces stress, and makes spaces feel larger by eliminating visual clutter that triggers mental fatigue.
- Declutter first by removing seasonal appliances, expired spices, and rarely-used gadgets; keep only daily-use items that justify counter real estate.
- Vertical storage solutions like floating shelves, pegboards, and under-cabinet racks multiply usable space without expensive renovations or permanent modifications.
- Containers, trays, and tiered organizers corral loose items and create visual boundaries that make countertops feel organized while maintaining functionality.
- Appliance garages, rolling shelves, and multi-function appliances eliminate counter clutter from small kitchen appliances by hiding or consolidating them strategically.
- Optimize corner and edge spaces with lazy Susan units and slim rolling carts, which recover 15-20% of wasted counter real estate in typical kitchen layouts.
Why Countertop Organization Transforms Your Kitchen
Countertop clutter doesn’t just look messy, it actively slows down meal prep and creates stress. When every surface is covered with appliances, utensils, and random items, simple tasks like chopping vegetables or rolling dough become obstacle courses.
Organized counters improve workflow by creating dedicated zones for different activities. A clear prep area next to the sink, a coffee station by the refrigerator, and open space near the stove make cooking faster and more enjoyable. Professional kitchens rely on this principle, and it works just as well at home.
Beyond function, clean counters make kitchens feel larger and more welcoming. Visual clutter triggers mental fatigue, while organized surfaces promote calm and focus. Studies on kitchen organization habits consistently show that homeowners who maintain clear counters report higher satisfaction with their cooking spaces.
Finally, proper organization protects countertops from damage. Cutting directly on granite or quartz, leaving wet items on wood butcher block, or overcrowding surfaces with heavy appliances can cause scratches, stains, and structural issues over time. Strategic storage extends the life of your investment.
Declutter First: What to Keep, Store, and Toss
Before buying a single organizer, audit what’s actually on your counters. The average kitchen accumulates duplicate tools, expired spices, and appliances that haven’t been used in months.
Items that belong on counters:
- Daily-use appliances (coffee maker, toaster, stand mixer if used weekly)
- Knife block or magnetic strip within arm’s reach of prep area
- Dish soap and sponge in a compact caddy
- Cutting board if used multiple times daily
- Salt, pepper, and cooking oil you reach for constantly
Items that should move to storage:
- Seasonal appliances (waffle iron, slow cooker, ice cream maker)
- Duplicate utensils and gadgets
- Decorative items that collect dust and grease
- Mail, keys, and non-kitchen clutter that migrates to counters
- Rarely-used small appliances (panini press, juicer, food dehydrator)
Items to toss or donate:
- Expired spices and condiments (check dates, ground spices lose potency after 2-3 years)
- Broken or single-use gadgets (that avocado slicer you used once)
- Warped cutting boards or stained dish towels
- Mismatched storage containers without lids
Be ruthless. If an appliance hasn’t been used in three months, it doesn’t earn counter space. Store it in a lower cabinet or pantry shelf. The same principle applies to decorative items, a single well-chosen piece beats five dusty collectibles.
Similar to the approach used for organizing kitchen drawers, group similar items together during the audit. This reveals duplicates and helps determine what storage solutions you actually need.
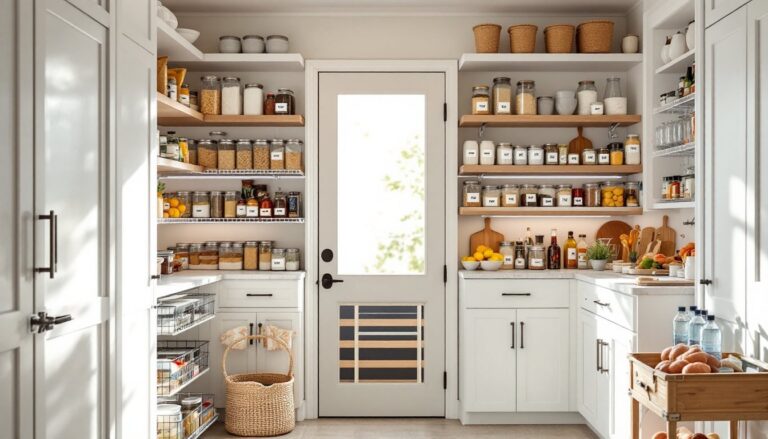
Vertical Storage Solutions That Free Up Counter Space
The biggest mistake in kitchen organization is thinking horizontally. Walls, backsplashes, and the space under upper cabinets hold massive storage potential.
Floating shelves add 12-18 inches of usable depth without permanent installation. Mount them 18-20 inches above counters to keep the workspace clear while storing frequently-used items like spice jars, oils, or everyday dishes. Use heavy-duty shelf brackets rated for at least 50 pounds if storing appliances or stoneware. Most floating shelves install with wall anchors into drywall, but anchoring into studs provides superior weight capacity.
Pegboard systems turn dead wall space into customizable storage. A 2×4-foot pegboard panel holds utensils, measuring cups, pot holders, and small pans. Mount it using 1/4-inch spacers behind the board so hooks can slide in easily. Pegboard works especially well in rental kitchens since it requires only a few screw holes.
Under-cabinet racks use the 6-12 inches between counter and upper cabinets. Look for models that mount with screws (more stable) rather than adhesive strips, which fail under heat and humidity. These racks hold wine glasses, mugs, paper towels, or cutting boards.
Tiered risers double or triple usable space by stacking items at different heights. Bamboo or acrylic risers work well for spice jars, canned goods, or small appliances like blenders. Choose models with non-slip feet to prevent sliding.
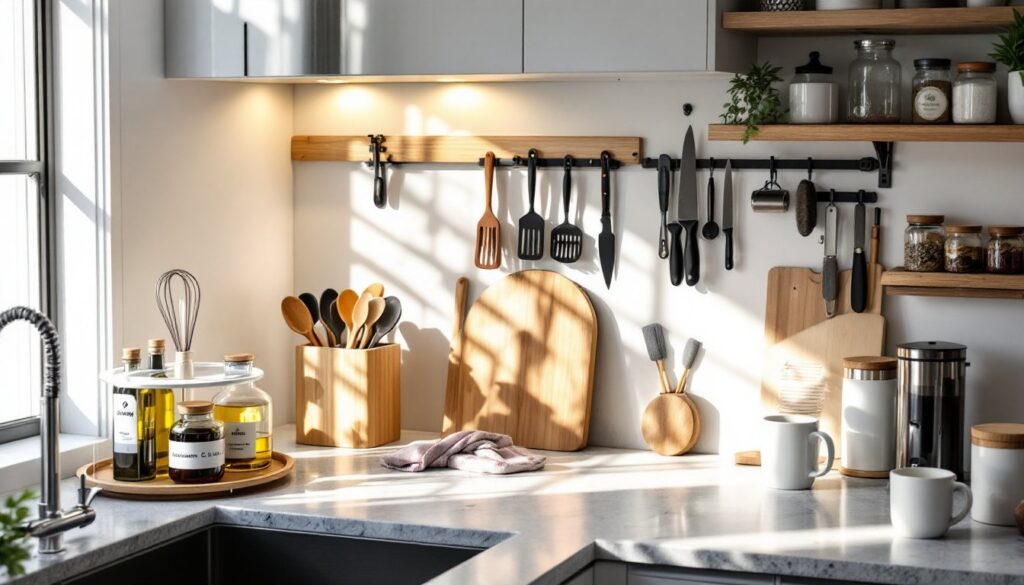
Magnetic knife strips free up counter space occupied by bulky knife blocks. Mount them 36-40 inches above the floor (comfortable reach height) on the backsplash or side of a cabinet. Ensure the strip is long enough to space knives safely, 12 inches minimum for a basic set, 18-24 inches for serious cooks.
When installing any wall-mounted storage, locate studs with a stud finder for maximum weight capacity. Drywall anchors work for lighter items (under 10 pounds), but anything heavier, especially shelves holding appliances, should anchor into studs or use toggle bolts rated for the load.
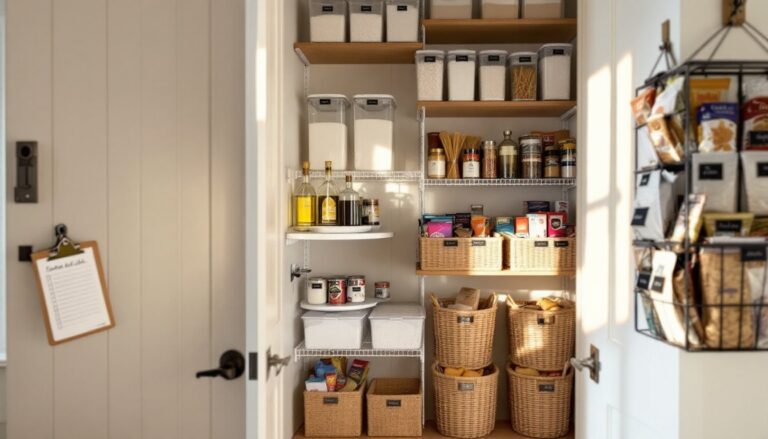
Smart Container and Tray Systems for Daily Essentials
Loose items multiply clutter faster than anything else. Containers and trays corral the chaos and create visual boundaries that make counters feel organized even when full.
Tiered lazy Susans work brilliantly for cooking oils, vinegars, and frequently-used condiments. A 10-12 inch diameter turntable fits into corner spaces and makes every bottle accessible with a quick spin. Choose models with raised edges (at least 1 inch) to prevent bottles from sliding off.
Utensil crocks keep spatulas, whisks, and wooden spoons upright and accessible near the stove. A 5-7 inch diameter crock holds a standard set without tipping. Weighted ceramic crocks stay put better than lightweight plastic.
Drawer-style organizers for countertops create concealed storage for tea bags, coffee pods, or sugar packets. These acrylic or bamboo boxes prevent small items from scattering while keeping them within reach. Look for models with divided compartments to separate different types of items.
Sink caddies unify dish soap, hand soap, sponges, and scrub brushes into one contained footprint. Stainless steel or silicone caddies resist rust and mildew better than plastic. Choose designs with drainage holes to prevent standing water.
Matching storage canisters for flour, sugar, coffee, and other staples reduce visual noise. Clear glass or acrylic containers make contents visible at a glance, while opaque ceramic protects light-sensitive items. Use airtight seals to maintain freshness, look for silicone gaskets rather than simple friction-fit lids.
When selecting containers, measure your available counter depth first. Standard countertops are 25 inches deep (with a 1.5-inch overhang), but appliances and backsplashes reduce usable space to 18-20 inches. Choose containers that leave at least 12 inches of clear workspace.
According to insights from kitchen organization experts, grouping items by function rather than by item type creates more efficient workflows. Coffee, filters, and mugs live together: cooking oils, spices, and utensils cluster near the stove.
Corner and Edge Optimization Strategies
Corners and edges are the most underutilized spaces in kitchens. Dead zones waste 15-20% of available counter real estate in a typical L-shaped or U-shaped layout.
Corner shelves (either wall-mounted or countertop models) turn awkward angles into usable storage. Two-tier corner shelves add 10-15 inches of vertical storage for items like cookbooks, small appliances, or decorative storage jars. Mount them at counter height or just above to keep items accessible without bending.
Lazy Susan corner units for countertops make deep corners functional. A 16-18 inch diameter turntable fits into most corner spaces and holds oils, spices, or small containers. This setup works particularly well in galley kitchens where corner space is limited but critical.
Slim rolling carts fit into narrow gaps between appliances or at the end of counter runs. Look for carts 6-10 inches wide that tuck into spaces too small for traditional storage. These work well for storing baking sheets, cutting boards, or cleaning supplies. Choose carts with locking casters to prevent unwanted movement.
Over-the-sink cutting boards extend workspace by 20-30 inches when needed. These boards rest on the sink rim, creating a temporary prep surface that stores flat when not in use. Ensure the board is at least 1 inch larger than your sink opening on all sides for stable support. Bamboo or solid hardwood boards handle weight better than lightweight plastic.
End-of-counter hooks use the sides of counter runs or islands. Adhesive or screw-mounted hooks hold dish towels, oven mitts, or reusable shopping bags. Position hooks on the side of the counter that faces away from main traffic paths to avoid snagging clothing.
In kitchens with limited counter space, the same vertical thinking used in pantry storage applies, go up rather than out. Wall-mounted fold-down shelves or drop-leaf extensions add workspace only when needed, then fold away to restore traffic flow.
Appliance Organization and Hidden Storage Hacks
Small appliances are the biggest counter hogs. A toaster, coffee maker, blender, and stand mixer can occupy 4-6 linear feet of counter space, often half the available surface in a standard kitchen.
Appliance garages (cabinets with retractable doors at counter level) hide toasters, coffee makers, and other daily-use items while keeping them plugged in and ready. Building a simple appliance garage requires basic carpentry skills: frame an opening in the backsplash area, install a tambour door or hinged panel, and add an outlet inside. Check local electrical codes before adding outlets, most jurisdictions require GFCI protection for countertop outlets.
For renters or those avoiding permanent modifications, appliance covers or fabric sleeves reduce visual clutter without requiring installation. These work best for items used less than daily.
Rolling shelves in lower cabinets bring heavy appliances like stand mixers to counter height only when needed. Install full-extension ball-bearing slides rated for at least 100 pounds. Measure the cabinet interior carefully, most base cabinets are 34.5 inches high inside, leaving room for a mixer on a 2-3 inch platform.
Charging drawers consolidate phone chargers, tablet cables, and other tech that migrates to kitchen counters. A standard 12-inch drawer with an interior outlet keeps devices charged and out of sight. Use a power strip with surge protection rated for enclosed spaces (check for UL listing).
Multi-function appliances reduce overall appliance count. An Instant Pot replaces a slow cooker, rice cooker, and pressure cooker. A high-quality food processor with attachments eliminates the need for separate blenders, choppers, and mixers. Before buying multi-function units, verify they perform core tasks well, some combination appliances compromise on quality.
Coffee stations consolidate mugs, coffee, filters, and sweeteners into one defined zone. Use a 30-36 inch section of counter near an outlet. Add a small tray or mat to define the boundary and catch spills. Wall-mounted mug racks above the coffee maker free up cabinet space.
Under-cabinet lighting isn’t just aesthetic, it makes counters more functional by eliminating shadows in prep areas. LED strip lights draw minimal power and produce less heat than puck lights. Install them toward the front edge of upper cabinets for even coverage. This improvement, combined with smart storage furniture concepts adapted for kitchens, creates workspace that’s both organized and pleasant to use.
Safety note: When organizing near outlets, ensure cords don’t drape across burners or create trip hazards. Use cord clips to route cables along backsplashes or cabinet sides. Never overload outlets, kitchen circuits should handle no more than 1,500 watts per outlet to prevent tripping breakers.
Conclusion
Organized countertops transform how a kitchen functions, faster meal prep, less stress, and more usable workspace. Start with a thorough declutter, then build storage systems that match actual daily habits. Vertical solutions, smart containers, and strategic appliance placement turn cramped counters into efficient workspaces. The best part? Most of these changes require nothing more than a drill, a few brackets, and an afternoon of work.