Pulling out an old dishwasher isn’t complicated, but it does require some planning and a few tools most homeowners already have. Whether you’re upgrading to a more efficient model or replacing a unit that’s given up the ghost, knowing how to safely disconnect and remove a dishwasher can save you the cost of a service call, typically $75 to $150 just for removal. This guide walks through the entire process, from shutting off utilities to getting the old unit out of your kitchen and into the hands of a recycler or scrap hauler. If you can use a wrench and follow a few safety steps, you can handle this project in an afternoon.
Table of Contents
ToggleKey Takeaways
- Dishwasher disposal can be accomplished in an afternoon with basic tools, saving homeowners $75 to $150 in service call costs.
- Signs that it’s time for dishwasher removal include persistent leaks, rust, grinding noises, repairs costing more than half a new unit’s price, and dishes coming out dirty or wet.
- Before starting dishwasher disposal, turn off the circuit breaker, shut off the hot water supply valve, and use a voltage tester to confirm power is off for safety.
- Disconnect the electrical connections, water supply line, and drain hose in sequence, then remove mounting screws and carefully pull the unit forward on its rollers.
- Multiple dishwasher disposal options exist: retailer haul-away ($25–$50), municipal curbside pickup, scrap metal recycling, or donation to Habitat for Humanity and charities if the unit still works.
- Clean the dishwasher interior before disposal or donation, and explore eco-friendly recycling programs through your utility company for potential $50–$75 rebates on old, inefficient models.
When It’s Time to Remove Your Old Dishwasher
Most dishwashers last 9 to 12 years with regular use, but several signs point to removal sooner. Persistent leaks that reappear after repairs, rust forming on the interior tub, or a control panel that no longer responds all signal the end of useful life. If the unit requires a repair that costs more than half the price of a new dishwasher, replacement makes more financial sense.
Noise is another indicator. A dishwasher that grinds, hums loudly, or rattles during cycles often has a failing pump or motor, components expensive enough to justify a new unit. Similarly, dishes that come out dirty or still wet after a full cycle suggest spray arm or heating element failure.
Before committing to removal, confirm that the issue isn’t something simple like a clogged filter or kinked drain hose. These are ten-minute fixes that don’t require pulling the unit. But if you’ve ruled out easy repairs and the dishwasher is beyond its warranty period, it’s time to disconnect and haul it out.
Preparing for Dishwasher Removal: Tools and Safety Steps
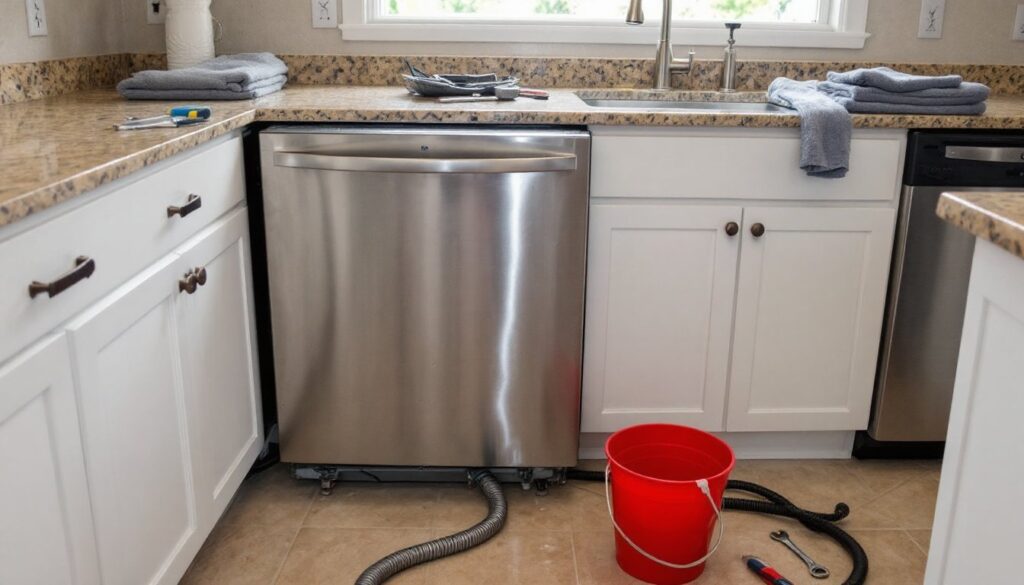
Gather your tools before you start. You’ll need an adjustable wrench or a set of box-end wrenches (typically 3/8″ and 1/2″ for compression fittings), a Phillips-head screwdriver, a flathead screwdriver for prying trim, a bucket or shallow pan to catch water, towels for spills, and a flashlight or headlamp for seeing under the unit. A voltage tester or non-contact voltage detector is essential if your dishwasher is hardwired.
Safety first: Turn off the dishwasher circuit breaker at your main electrical panel. If the unit plugs into an outlet under the sink, unplug it, but still flip the breaker to be safe. For hardwired units, the circuit breaker is your only disconnect. Use the voltage tester to confirm power is off before touching any wires.
Next, shut off the hot water supply valve under the kitchen sink. This is usually a small oval or round handle on the line that branches off toward the dishwasher. Turn it clockwise until it stops. If there’s no dedicated shutoff valve, you’ll need to close the main water supply to the house, a strong argument for installing a shutoff valve before you start (it’s a $10 part and takes five minutes with a compression fitting).
Lay down old towels in front of the dishwasher and have your bucket ready. Even after shutting off water, residual water in the supply line and drain hose will spill when you disconnect fittings. Wear work gloves to protect your hands from sharp metal edges and safety glasses if you’re working in a tight space where you might bump your head.
Step-by-Step: How to Disconnect and Remove Your Dishwasher
Disconnecting Water and Electrical Connections
Start with the electrical connection. Open the dishwasher door and locate the lower access panel at the base of the unit, this is usually held by two to four screws. Remove the screws and set the panel aside. You’ll see the junction box cover on the front lower left or right corner of the unit (depending on the model).
Remove the junction box cover, typically secured by a single screw. Inside, you’ll find wire connections, most commonly, a black (hot) wire, a white (neutral) wire, and a bare copper or green (ground) wire joined with wire nuts. Double-check with your voltage tester that no power is present. Unscrew the wire nuts counterclockwise and separate the house wiring from the dishwasher wiring. If it’s a plug-in unit, simply unplug it from the outlet under the sink.
Move to the water supply line. Under the sink, locate where the dishwasher’s braided stainless steel supply line or copper tube connects to the hot water valve. Place your bucket beneath the connection and use your adjustable wrench to loosen the compression nut. Expect water to dribble out as you break the seal. Once the nut is free, pull the supply line away from the valve.
Now address the drain hose, which connects to either the garbage disposal, a dishwasher tailpiece on the sink drain, or an air gap mounted on the countertop. The hose is typically secured with a hose clamp, loosen the screw on the clamp with a flathead or Phillips screwdriver (depending on clamp type) and slide the clamp back. Pull the hose off the connection point. Tip: some installations have a high loop or air gap to prevent backflow, as recommended by most plumbing safety standards.
Finally, disconnect the drain hose at the dishwasher itself. This connection is usually visible once you remove the lower access panel. Loosen the clamp and pull the hose free. Water will drain from the hose, so keep your bucket and towels handy.
Removing the Unit from Its Cabinet Space
With utilities disconnected, it’s time to free the dishwasher from the cabinet. Open the dishwasher door and look along the top edge of the unit where it meets the underside of the countertop. You’ll find two or more mounting screws that secure the dishwasher to the countertop or cabinet frame. These are often Phillips-head screws. Remove them completely.
Some dishwashers also have side mounting brackets that attach to adjacent cabinets. Check both sides of the unit near the top front corners. If present, remove these screws as well.
Next, check the front legs of the dishwasher. Most units have adjustable leveling legs at the front that can be raised or lowered by turning a threaded rod or screw. You may need to lower the legs slightly to clear the countertop lip. Use your wrench or a screwdriver (depending on the leg design) to turn the adjustment screw counterclockwise, lowering the front of the unit by about 1/4″.
Now gently pull the dishwasher forward. Place your hands on the sides of the unit, not the door, and pull steadily. The dishwasher should slide on its rollers or glide feet. If it resists, stop and check for any screws you missed or wiring still attached. It’s common for the drain hose or supply line to catch if they weren’t fully disconnected.
As the unit comes out, guide the drain hose and electrical wiring through the access hole in the cabinet. Once the dishwasher is a few inches out, you can maneuver it more easily. Dishwashers weigh 60 to 100 pounds, so if you need to lift or tilt the unit, get a second person to help. Don’t drag it across finished flooring, use cardboard or a furniture dolly to protect your floors.
Dishwasher Disposal Options: Where to Take Your Old Appliance
Once the dishwasher is out, you have several disposal routes. The simplest is often retailer haul-away. Most big-box home improvement stores and appliance retailers offer removal and disposal when you purchase a new dishwasher, fees typically range from $25 to $50, and they’ll recycle the old unit responsibly.
For a fee-free option, check your local municipal recycling program. Many cities offer curbside bulk pickup or drop-off days for large appliances. Call your waste management provider or visit their website for the schedule. Some municipalities require you to remove the door or disable the latch before placing the dishwasher at the curb, a safety measure to prevent child entrapment.
Scrap metal recyclers will often take dishwashers at no charge, or even pay a few dollars, since the units contain steel, copper wiring, and sometimes stainless steel tubs. Check for a scrap yard near you: many accept appliances during regular business hours. You’ll need a truck or trailer to transport the unit.
If the dishwasher still works but you’re upgrading for aesthetic or efficiency reasons, consider donating it. Habitat for Humanity ReStores, local charities, and community organizations often accept working appliances. Ensure the unit is clean and functional before donating, and call ahead to confirm they’ll accept it.
Eco-Friendly Recycling and Donation Alternatives
Appliance recycling programs operated by utilities or environmental nonprofits sometimes offer free pickup and cash incentives for old, energy-hogging dishwashers. These programs focus on removing inefficient units from circulation. Check with your electric or water utility for available rebates, some areas offer $50 to $75 for recycling a pre-1994 dishwasher.
Another option: manufacturer take-back programs. A few dishwasher brands have started voluntary recycling initiatives, especially when you buy a new model from them. While not yet widespread in 2026, it’s worth asking when you shop.
For the DIY-minded, dishwashers can be parted out for reusable components. The stainless steel tub can be repurposed for outdoor planters or utility sinks, the racks make excellent drying racks for painting projects, and the door springs and rollers can serve as spare parts for other repairs. Home improvement enthusiasts often find creative uses for appliance parts in the garage or workshop.
Before disposal or donation, wipe down the interior and remove any stuck-on food or debris. A clean appliance is more likely to be accepted by charities and shows respect for the next handler. Also, keep your owner’s manual if you’re donating or selling the unit, it adds value and helps the next user.
Finally, note that in most jurisdictions, dishwashers are not considered hazardous waste and can be disposed of with regular bulk trash or recycling. But, if the unit has been treated with mold remediation chemicals or other contaminants, check with your local environmental health office for proper disposal procedures. Kitchen appliance guidelines often include disposal best practices and local resource directories.